We have recently released a plugin that makes implementation on WordPress websites even easier.
Implementing the Trustist WordPress Plugin
Please follow the steps below to add the Trustist widget to your website using our WordPress plugin.
Step 1 – Installing the plugin
Install the plugin here – https://wordpress.org/plugins/trustist-reviewer/. Please ensure that your website is running on the WordPress version 5.0.1 or higher in order to use this plugin.
Step 2 – Navigating to settings
Login to the admin of your site and select ‘Settings’. From the list of options under settings, select ‘Trustist REVIEWer’. If that option is not appearing, the plugin may need to be activated by navigating to ‘plugins’, finding the Trustist REVIEWer plugin and clicking ‘activate’.
Step 3 – Configuring settings
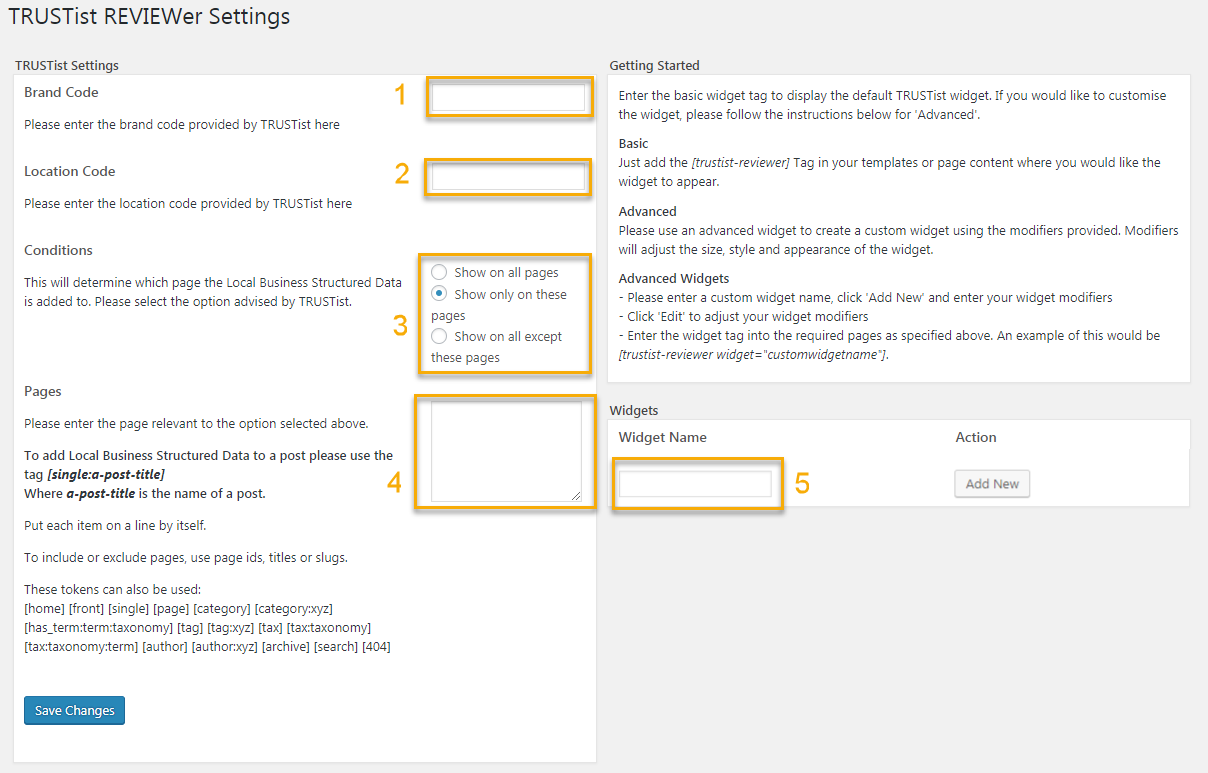
Once you are in the settings panel of the plugin, you will be able to see a screen like the image below.

3.1: In box 1, enter your Brand Code.
3.2: In box 2, enter your Location Code.
Your brand and location codes are provided by Trustist within your account. If you do not have your brand and location codes, please contact us at [email protected].
3.3: In box 3, ensure the ‘Show only on these pages’ option is selected.
3.4: In box 4, enter the title of your contact/location page. For example, if the title of your contact page is ‘Contact Us’ you should enter ‘contact-us’. After entering the page title, click ‘save changes’. There is more information on how to set the conditions here – https://docs.itthinx.com/document/widgets-control/usage/pages/.
Step 4 – Custom Widgets
If you would like to create a custom widget, enter your chosen widget name into box 5 and click ‘Add New’. Once your custom widget has been added you can make changes using the options available to edit how the widget will look on your pages. If you decide to use a custom widget, your custom widget tag (needed for step 5) will be [trustist-reviewer widget=”customwidgetname”].
If you would like to use the standard Trustist widget, your widget tag will be [trustist-reviewer].
Step 5 – Widget Tag
In order to get the widget to display on your pages, you now need to add your widget tag (specified by your chosen widget in step 4. The easiest way to do this is to edit either the header or footer of your site and add your widget tag wherever you would like the widget to appear. Alternatively, if you do not want the widget to appear in either your header or footer, simply add your widget tag to each page wherever you would like the widget to appear.